Get running (macOS)
The end-to-end path: install Plexus, start the gateway, expose a source, and connect your first agent — so it can discover a capability, get a grant, and invoke it.
Plexus is a local capability gateway. By default it binds only to 127.0.0.1; opening it to the LAN is opt-in and connection-key gated (read the security model first). All state lives under ~/.plexus/. New to the model (Connector → Source → Capability, provenance, grants)? Skim the concepts, or just follow along.
Keep the two roles straight throughout:
- You are the admin. You hold the connection-key, the management credential; it authenticates the
/adminconsole. You never give it to an agent. - The agent gets its own credential. When you connect an agent, it enrolls for a durable per-agent PAT and calls with that — never the connection-key.
Platform
macOS (Apple Silicon or Intel). The Apple Calendar / Reminders sources are macOS-only.
1. Prerequisites
Bun ≥ 1.3.0:
curl -fsSL https://bun.sh/install | bash
bun --version          # → 1.3.x
2. Install
git clone <your-plexus-remote> plexus    # or cd into your existing checkout
cd plexus
bun install
The /admin console is a Vite SPA in packages/web-admin. If its dist/ is missing, build it once:
cd packages/web-admin && bun install && bun run build && cd ../..3. Run the gateway
bun run start --vault ~/Documents/MyVault # --vault is optional; see step 5It stays running (Ctrl-C to stop) and prints the management URL, your connection-key (noting that it's the admin credential), and the state directory. The first run creates ~/.plexus/ — nothing to configure. If 7077 is taken, change the port with PLEXUS_PORT=7099 bun run start; always reach the gateway on the exact 127.0.0.1:<port> it printed.
Prefer a GUI?
cd packages/desktop && bun run start boots the same gateway in an Electron app and injects the connection-key into the console for you. Every concept below is identical.
4. Open the console
Open http://127.0.0.1:7077/admin. The console is your "who I trust / what I expose" cockpit: Overview, What I expose (every capability with its provenance + sensitivity), Agents, Approvals, Grants, Activity.
The console is served same-origin, so its assets load without a key, but every /admin/api/* call needs the connection-key. The desktop app injects it; a plain browser caches it after a one-time paste. You, reaching /admin locally, are the human approver.
The connection-key is your admin credential only. To see it: bun run start --print-key (or cat ~/.plexus/connection-key). It is never served over any agent-reachable route, and you never paste it into an agent — connecting an agent (step 6) gives it its own credential.
5. (macOS) Grant the underlying app permission — TCC
First-party Apple sources (apple-calendar, apple-reminders) read through macOS, so the first call triggers Apple's TCC consent. Until you grant it, Plexus returns a clear, recoverable message instead of crashing. Grant it in System Settings ▸ Privacy & Security: Automation (allow Plexus to control "Calendar") + Calendars, and Reminders. These are one-time OS approvals, separate from Plexus's own grants.
6. Connect your first agent
This is the whole onboarding — no key-pasting, no hand-written config.
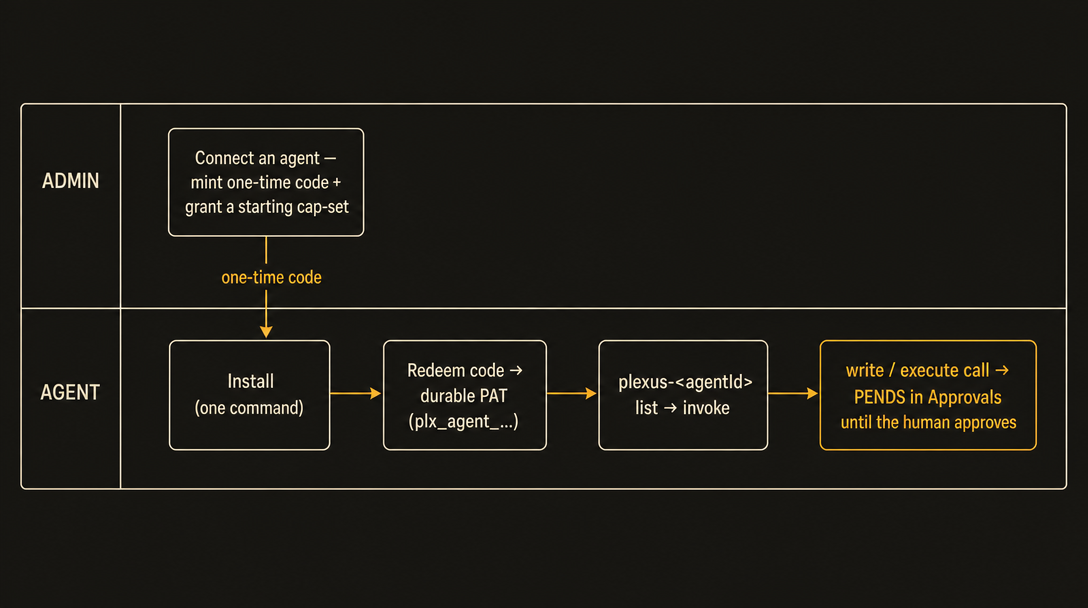
a. Provision it in the console. Open Agents ▸ Connect an agent:
- Identify — give it an id (e.g.
my-claude-runner) and pick its type (Claude Code gets a compiled plugin). - Capabilities — check a starting set to grant as standing (usable the moment it connects). Read caps can stand; execute / high-sensitivity caps can't — they're approved per use and show up under skipped. Pick a trust-window (default 7 days).
- Install — copy the one command it gives you.
Under the hood this mints a one-time enrollment code and grants your cap-set; the endpoint is GET /integration/:agentId (backed by a public install.sh) if you'd rather script it.
b. Run the one command (in the agent's environment). It installs a per-agent Claude Code plugin, redeems the code for a durable per-agent PAT (stored 0600), and deletes the code. Nothing else to wire.
c. The agent calls capabilities through its own bundled launcher, plexus-<agentId>:
plexus-my-claude-runner list                      # discover: what's callable now + what needs approval
plexus-my-claude-runner obsidian.vault.read Welcome.md
list is how the agent sees what it can do, including newly exposed capabilities — it never needs to guess. The launcher is version-isolated (it runs its own bundled engine, never a global plexus) and handles the credential silently. The launcher is the agent's complete and only interface — it never hand-rolls HTTP or touches auth. If something can't be done through it, the agent isn't authorized that way; it asks you or requests a grant.
d. The approval flow — pending → approve. A read on a first-party source flows automatically (you pre-granted it). A write, or any execute capability, is default-deny: the agent's call comes back pending, the request appears in the console's Approvals tab with a plain-language card (who, what, how long), and only after you approve does the call go through. Execute capabilities are approved per use, every time — they can never become standing, not even by you.
Watch the loop without a real agent
See the reference clients under examples/. To understand the raw wire protocol underneath the launcher, read the protocol — but an agent never speaks it by hand; the launcher does.
7. Expose your own source (optional)
The Apple sources work out of the box. To expose your notes, add an Obsidian vault — from the console's Sources panel, the plexus source admin CLI, or launcher flags:
bun run start --vault ~/Documents/MyVault               # read-only ⇒ obsidian.vault.read
bun run start --obsidian-rest --rest-url https://127.0.0.1:27124   # read-write ⇒ obsidian-rest.vault.{list,read,write}
The flags persist to ~/.plexus/sources.json and auto-load on the next boot (add --ephemeral for this run only). Managed sources appear immediately in .well-known and in every agent's list — no restart. (Custom extensions you install persist the same way, surviving a gateway restart via ~/.plexus/extensions.json.)
Command reference (admin)
| Command | What it does |
|---|---|
bun run start | Boot the gateway on 127.0.0.1:7077; stay running. |
bun run start --vault <path> | Also expose an Obsidian vault as a read-only source (persists). |
bun run start --obsidian-rest | Also expose a read-write Obsidian REST source (persists). |
bun run start --ephemeral | With a source flag: register for this run only. |
bun run start --print-key | Print the (admin) connection-key and exit. |
PLEXUS_PORT=N bun run start | Use port N instead of 7077. |
bash run-tests.sh | The canonical gate: bunx tsc --noEmit + bun test. |
All state lives under ~/.plexus/. To reset: stop the gateway and remove that directory — the next start regenerates a fresh connection-key + signing secret.
Next steps
- The concepts — the mental model (provenance, the two clocks, the self-describing floor + the compile projection).
- Connect an agent — a real coding agent, end to end.
- The security model — the authoritative trust & auth model (connection-key vs per-agent PAT, the execute-never-standing rule).